Tuesday, February 7, 2012

Purple Peanut Butter & Chocolate Cookies

I saw these cute pink cookies on Pinterest and decided to make some in my favorite color -- purple!! They are very easy: make a batch of your favorite peanut butter cookie recipe, roll dough balls in colored sugar, bake, and put a Hershey's Hug on top a few minutes after they come out of the oven. I just used plain food coloring drops on this batch, but I'm positive a gel coloring would have made a more vibrant color. Next time, next time. But I assure you they will taste great no matter what color they are. :O)

 My little helper rolling on purple sugar.

Pretty purple peanut butter & chocolate cookies :O)

Monday, February 6, 2012

Cutting Kid's Bangs with Tape

I recently found a copy of Heloise’s Housekeeping Hints (1962, her first book!!) at a rummage sale and I am in love with it. One of the first things I saw in there was a handy trick on cutting a child's bangs by using clear tape. What?! I had never heard of this before, but obviously this trick has been around a while. I found this vintage Scotch Tape advertisement that actually features the bang-cutting technique:


My 4-year-old's bangs must have had some Miracle Grow dropped on them at some point, because they sure do grow fast. I'm no professional hair stylist for sure, but sometimes a mom's gotta do what a mom's gotta do. And while she sits fairly still for a child, things can get a little tense cutting bangs. So to make things easier, I decided to try the tape. It worked great!! The tape provided a straight line to cut above, and held onto the trimmings. No mess and no little pieces of hair falling in her eyes!!

It basically works like this: dampen the bangs and comb them straight, place tape across bangs where you want to cut, then cut just above the top of the tape.


Here are our results from the first trim with tape:


Not bad, eh?

Sunday, February 5, 2012

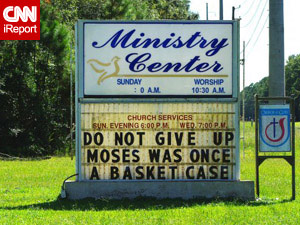
Church Sign Sunday {02-05-12}

Confession: I love reading church signs. Funny, poignant, whatever. I'm non-denominational when it comes to church signs. Some of them are subtle, and some are plain crazy. But I love them nonetheless, so I'd like to share some of the ones I run across either in person or on the intarwebs. :O) Feel free to post in the comments section links to others that you like, or write some sayings you like and share the love!!


Saturday, February 4, 2012

Baby Bib Card

If I haven't mentioned it before, let me just say I LOVE MY SILHOUETTE!! My sweet husband got it for me as a Mother's Day present last year. One of the things I like to use it for is to make personalized cards. I made this cute Baby Bib Card using paper that matched the baby blanket I gave at a friend's baby shower. It was fun to give a matching "collection" -- LOL.

Here's the pink, black, and green card:


And here's another made with yellow and teal:

 
Isn't it great when things get all matchy matchy? :O)


If you love scrapbooking, crafting, sewing, etc., you'd probably love a Silhouette as much as I do. It cuts paper, vinyl, and fabric, and the kinds of things you can make are endless. I have some more projects in the works using my Silhouette I hope to show you soon!!

Friday, February 3, 2012

Baby Blankets 3 Ways {#1}

Our neighborhood has been blessed with three baby girls right in a row. That means I had an excuse to sew up three baby blankets -- yay!! I absolutely love fabric shopping (yes Mom, you heard that right) and had lots of fun picking it out especially for each baby's blanket.

For Baby Blanket #1 I chose a bright pink and green color pallete to match baby's room. This blanket is a simple 36"x36" square. I simply cut the front and back fabric to size, sewed right sides together, then turned out and finished the seam. On top I sewed on some white and sparkly silver ric-rac about 4" inside. Then I finished the edges with a pretty embroidery stitch on my machine.


I also made some coordinating burp rags out of cloth diapers and flannel fabric. On one of them I got a little crazy and added some green ruffles to the pink flannel to match the blanket. Someday I will get one of those weird-looking ruffler contraptions that actually fits my machine and ruffles will take less time. Someday.


I like these types of blankets because I think they're great for baby to sit and play on or for easy cover when it's not cold enough for a thick blanket. Add in the useful (pretty) burp rags and you have a great shower gift.

Alltogether this was an easy project. The hardest part was waiting on my sewing machine to do all its lovely embroidery stitching around the edge. Lucky for me I have a wonderful chiropractor to realign my neck and back after a long stretch of using bad sewing posture. :O)

Stay tuned for Baby Blankets 2 & 3!!

Thursday, January 12, 2012

Yummy Homemade Lip Gloss


We've gone through countless tubes and pots of lip gloss at our house with our 4-year-old daughter. She loves playing with it while playing dress-up, and also likes to use it at night for her "chapped lips." Since it's now winter I'll buy into the chapped lips part. Mine could use some help, too!!

Earlier this week, thanks to Pinterest (LOL), I found an EASY way to make your own lip gloss using just Vaseline and Kool Aid. And Vaseline is wonderful for softening lips, so it really works and can be used for more than just playtime. Plus it's super-cheap.

INGREDIENTS:
1/2 cup Vaseline
1/2 package of Kool Aid


SUPPLIES:
  • Microwaveable bowl (I used my 2-cup Pampered Chef glass prep bowl)
  • Something to stir with (a spatula works great)
  • Containers for the finished lip gloss (little pots from the craft store, etc.)

HOW TO MAKE THE LIP GLOSS:


1. Put 1/2 cup Vaseline in bowl.

(After 1 minute)
(After 2 minutes)
(After 2 1/2 minutes)

2. Microwave 30 seconds at a time, stirring in between, until Vaseline turns to liquid. Be careful -- the bowl and liquid will get very hot, so be sure to use a towel or oven mitts when taking it in and out of the microwave. It took mine 2 1/2 minutes to melt completely.

 3. Let cool down until Vaseline starts to gel slightly and look a little cloudy. I let mine sit 15 minutes.

 4. Stir in half a package of Kool Aid powder until dissolved.

 5. Put in containers and leave to solidify.

I forgot to buy some little containers for the lip gloss -- oops. In the meantime we're using random small medicine cups and a little plastic Glad container. I think in some cute containers these would be perfect for giving as little gifts, or for favors at a party or playdate. If you get any of the cute little pots, there are some cute printable labels here, or you could easily make your own. I intentionally halved this recipe from the original post. Even half a cup makes a lot of lip gloss!! So far it's a big hit in our house, and I'm sure we'll make some more yummy homemade lip gloss in a different flavor very soon. :O)

Tuesday, January 3, 2012

Jewelry Board Pile-Up {Organize & Unclutter!!}


If your jewelry drawer/box/whatever is anything like mine, its contents are unorganized and cluttered all over the place. I finally got tired of digging for things, trying to find matching earrings and all that mess, plus I thought my jewelry deserved to be taken care of just a little bit better, so I decided to do something about it. As you can see, there was an "attempt" in my jewelry drawer to keep like things together, but the menagerie of misfit boxes just wasn't cutting it anymore.

 
See the random assortment of boxes and containers, and my poor bracelets squished together?

I headed to my local craft store happy place and found a few items to try out my idea -- a foam-core insert fitted to my drawer. The whole thing turned out quite well and I'm very proud to say that eight months later, it is still in use and looks the same as when I made it!!

Here's what I used:
  • Foam-core board
  • Spray adhesive
  • Fabric
  • Map push pins
  • Scissors

Here's how to make your own jewelry board:

First, measure the inside of your drawer or area to put the new jewelry board. Cut your foam-core and then place it in the drawer to make sure it fits. Keep cutting until it fits snugly.


Shake up your spray adhesive and spray a good layer onto the front of the board. Lay your fabric on top and smooth out any wrinkles. I used a solid light-colored fabric so I could still see my jewelry well (i.e. no busy prints).


Flip over the board and fold down the excess fabric (trim if necessary), using spray adhesive just like before.


Now you are ready to do a little design work to figure out where you want everything on your board!! Put in some push pins to hold earrings, necklaces, bracelets, charms -- whatever you want to keep in place. Regular push pins will work fine too, but I found some pretty map push pins on sale and just had to get them for this special project. :O)


For necklaces I used one pin at the top and one at the bottom; bracelets one at the top; earrings one for a pair of hook style, and individual pins for others. Basically do whatever works best for the type of jewelry you have. I had a few necklace slides and other things that just wouldn't work with a pin, so I kept them off to the side in a tray. I kept a place for rings and my watch off to the side as well.


Put the board in your drawer and admire your neatly-placed jewelry!! Open and shut your drawer and leap for joy because your pretty things are still in the same place and not all squished in the corner!!


The nice thing about this board is it's always changeable. You can add and move items around as you have more to put on there, or if you switch jewelry with the seasons. Most importantly, you can SEE all your jewelry at a glance and not have to dig through a mess to find something. You might even wear something more often now that you have uncovered it.


This is a thrifty, easy, and quick way to battle the jewelry drawer pile-up. Now go grab some supplies and organize your shiny loot!!

Note: These pieces are not expensive baubles, just your everyday fun jewelry. If you are lucky enough to have very expensive jewelry, I'd suggest finding another way to organize it other than with push pins. :O)

LINKED UP AT:


Related Posts Plugin for WordPress, Blogger...