Tuesday, February 28, 2012

Make Your Own Fresh Teriyaki Sauce


This Teriyaki Sauce is so easy and delicious, you won't want to buy it from a bottle ever again. Thanks to a recipe I found at Weelicious (a super blog for finding kid-friendly recipes), making it fresh will not only taste great, but also save you from some unfriendly preservatives and other ingredients sneaking their way into your food. Heck, it might even be cheaper than buying a bottle of pre-made sauce.

Confession -- on the night I made this I also tried new recipes for eggrolls, stir-fry rice, and egg drop soup, making it quite possibly not my brightest idea. The food was tasty -- it just took about two hours to get everything done. I sure had a hungry family by then!! The egg rolls were the major hold-up -- lots of chopping, filling, and wrapping to do. Next time I will make them ahead and freeze for when I am ready. Live and learn!!

This recipe calls for five simple ingredients. If you've never used fresh ginger before, here's a great chance to give it a try. You can find it in the produce area of the grocery store. Just use a vegetable peeler to remove the outer skin and use a fine grater or Microplane to make quick work of the grating part.

TERIYAKI SAUCE
1 (8 oz.) can Crushed Pineapple in Juice
1/2 cup Soy Sauce
3 Tbsp. Honey
1 Tsp. Fresh Ginger, peeled and grated
1 Small Clove Garlic, minced
  1. Place all ingredients in a bowl and whisk to combine. Can be used for a marinade at this stage.
  2. To make sauce, combine 1/2 cup sauce mixture with 1 tsp. of cornstarch in a saucepan and cook over medium heat for 1 minute or until thickened.
This, of course, is perfect for chicken. To make a juicy Teriyaki Chicken, simply marinate 4 boneless skinless chicken breasts in 1 cup of the Teriyaki marinade for about an hour (overnight if you can). Then place chicken on a baking sheet and put in an oven set to broil, on the middle rack of your oven. Cook for 8-10 minutes on each side, or until chicken is done. Remove chicken from the oven and allow to cool for several minutes. Slice the chicken however you like, cover with sauce, and enjoy!! Remember to discard the leftover marinade (it has raw chicken ickies in it, so don't even think about using it to make anything else).

 Our two-hour dinner plate, LOL.

Enjoy your yummy new sauce -- and remember not to make too many new things at once!!

Friday, February 24, 2012

Disappearing Nine Patch Baby Quilt

 Today I'm happy to share with you the bright quilt I made for my newest nephew. Now at the time I picked out fabric I didn't know if I was getting a niece or nephew, and my sister-in-law just asked for bright colors. This wasn't what I intended on getting when I left for the fabric store, but if you know me it's not a big surprise I came home with something completely different, LOL. I picked out some bright colors with a pop of animal print to coordinate with the zoo animals on the backing fabric.


I used the Disappearing Nine Patch pattern for the top. It's an easy pattern I found a while back on one of my favorite sewing blogs, Cluck Cluck Sew. The gist of the pattern is to make a basic nine patch out of 5-inch squares, then cut the nine patch into fourths, and piece the resulting blocks together to make the quilt top.


For this quilt I made five nine patches. Then I cut into fourths for the "disappearing" effect and stitched together four across and five down. I also added a solid border with orange circles fabric around the finished nine patches and then a border of rectangles outside that. Next up was to make a nice "quilt sandwich" with the top, batting, and bottom in preparation to quilt everything together. It's hard to tell in the pictures, but I used orange thread to quilt inside and outside the border of each nine patch and the border pieces.


Then I grabbed my bias tape maker to make my own bias out of the orange circles fabric to give a nice coordinating finished look for the binding. If you've never made your own bias, all it takes is a bias tape maker (about $5), your fabric, and an iron. I also like to use a starch spray (Mary Ellen's Best Press is my favorite) for a better result after ironing. Then you have a bias tape that perfectly matches your quilt -- yay!!


My nephew is four months old now and already has gotten lots of use out of his blanket. I hear he loves it for tummy time and playing, and also loves looking at the bright colors!!

Thursday, February 23, 2012

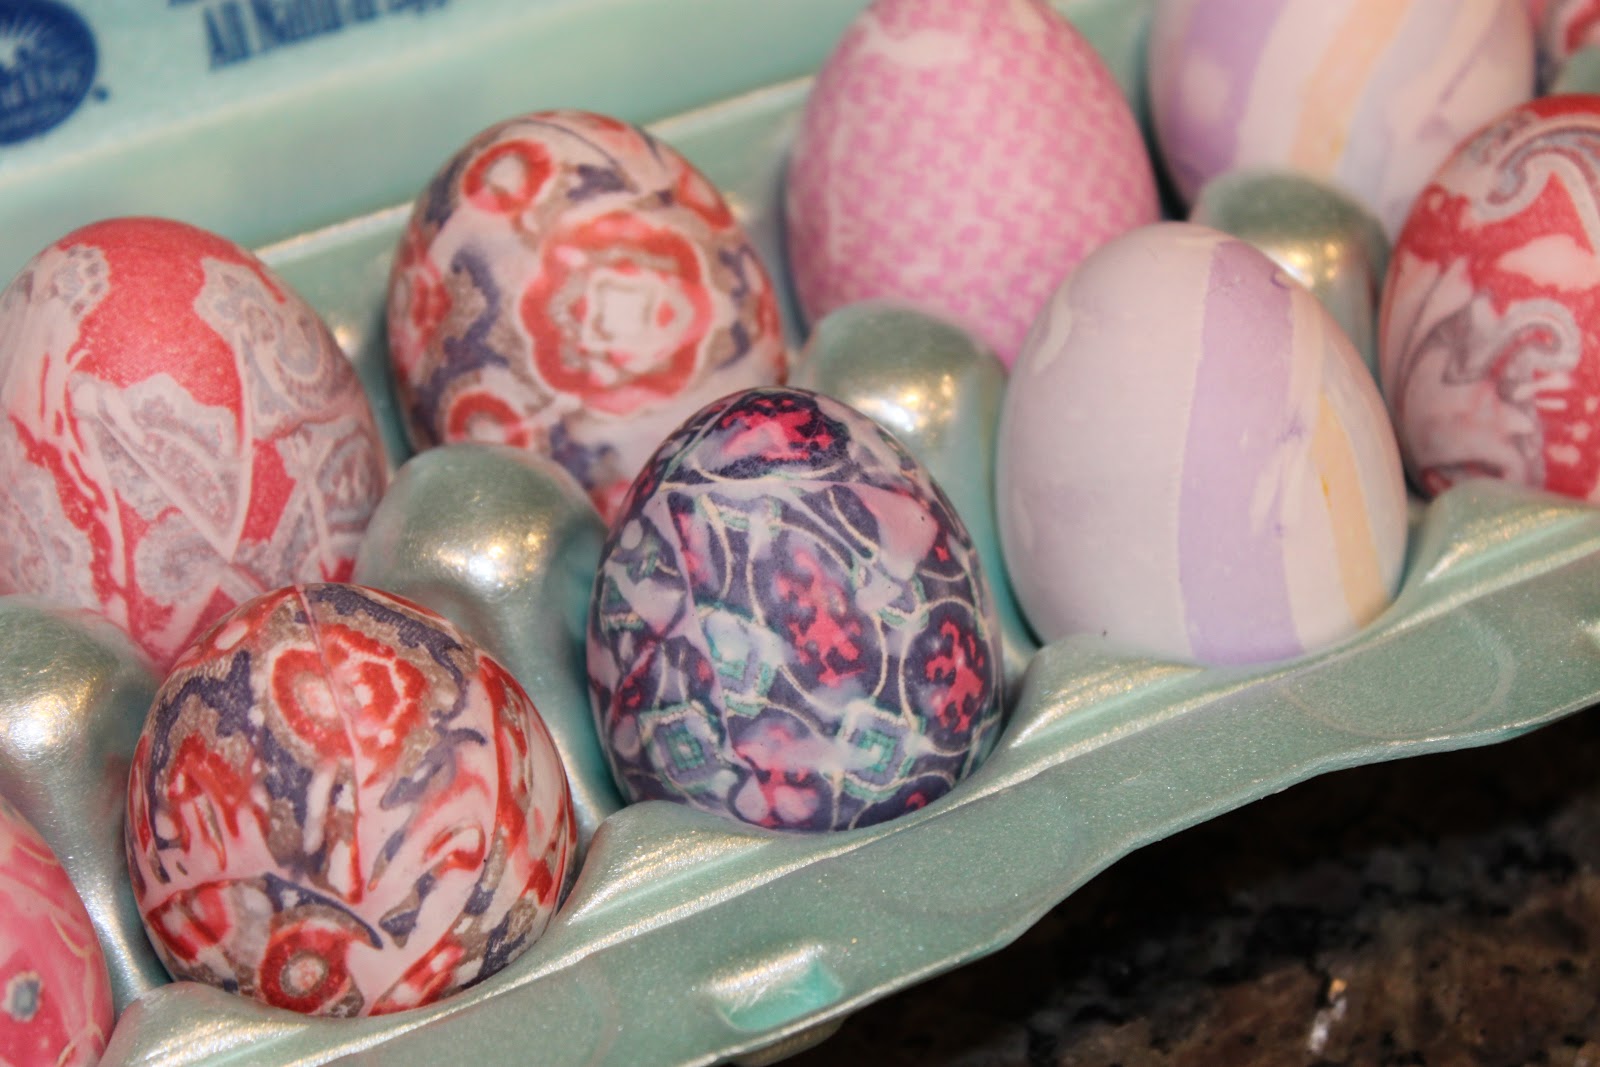
"Tye-Dyed" Easter Eggs

Easter is getting close and it's time to start thinking about how to decorate those eggs!!

 Last year we tried the "tye-dyed" method and some of them turned out really cool. Making them is easy; just make sure you have gathered up some fun silk ties first.

We used the awesome Silk-Dyed Eggs tutorial at Our Best Bites.

Here's how our first try at tye-dyed eggs turned out:


The ties we used.

Have fun making your own tye-dyed eggs!!

Wednesday, February 22, 2012

{What I Love Wednesday} Fly Lady

Have you heard of Fly Lady? She's a great lady who knows just how to motivate someone like me. She's always there with simple reminders and words of encouragement for everyday life. Oh, and she also has tips on keeping your house clean. :O)

If you've never visited the FlyLady website, get to it now!! Sign up for her daily email.

If you're like me and sometimes the shape of your house gets you down, Fly Lady has some advice: start with babysteps and one simple habit -- shining your sink. I know it sounds silly, but keeping a shiny sink is not only easy, but it will transform your day-to-day routines and how you feel about yourself. Keeping a shiny sink simply means to make sure all your dishes are washed (or in the dishwasher) every night before you go to bed, leaving you with an empty sink to greet you the next morning. Then you put away your clean dishes and have a place to put your dirties all day, cleaning as you go. Doing so in turn makes after-dinner cleanup a breeze. Then you're free to be with your family or get to other more important things you want to do.


I like to visit the Launch Pad to see what my mission is for the day. They are always quick -- 15 minutes or less!!

The FlyLady website is full of easy cleaning habits you can begin to implement in your daily routine. The key is to take babysteps and not overwhelm yourself. Do something for just 15 minutes. You don't have to wait until you have a two-hour block of time to tackle something, because honestly, when does that happen?! Just get started for 15 minutes a day. Before you know it clutter will be gone, clothes will be washed and put away, the carpet will be vacuumed, dishes will be done, and you'll have more time for yourself and your family.

Sometimes we are so hard on ourselves and cause stress just for not feeling like we are "caught up" with housework. It's an awful feeling, but you can get rid of negative attitudes and find the joy and contentment that remains. And FlyLady stresses that things don't have to be "perfect," just done the best you can. Any housework done, no matter what, still blesses your home and your family. I hope you visit FlyLady soon and start to find some peace in your home routines.

Tuesday, February 21, 2012

{The Best} Fried Chicken


Ya'll -- yes the Southern girl voice is coming out for this one -- forget all those "Best Way to Make Fried Chicken" cover photos and articles that are out right now. The BEST and EASIEST way to make fried chicken uses only a few basic items and is ah-mazing. I can (again) thank Heloise for this one from her 1962 book, Heloises's Housekeeping Hints.

Ready for the lowdown? Here's what you need:
  • A big bowl
  • Water
  • Salt
  • Chicken (fryer quarters, legs, thighs, whatever you want)
  • Flour
  • Crisco shortening, plain
  • Cast-iron skillet with lid (or a non-stick skillet with lid)
  • Tongs


  1. First you will fill your big bowl with SALTED water, then place your chicken in here to soak for a while. (Heloise says you also can take the skin off the chicken and this method still will yield super crispy fried chicken.) Let it soak until frozen chicken is thawed, or until fresh chicken has the chill knocked off.

  2. Next, pull your chicken out of the water and immediately coat well in plain flour. That's right -- no salt or other seasonings required. Don't shake the water off the chicken. It helps the flour form a seal around the chicken. Remember, we want to keep all those tasty juices INSIDE the chicken!!

  3. Let the floured chicken rest for at least 30 minutes. 
  4. While your chicken is resting, heat up some plain Crisco shortening in your skillet. About an inch's worth will do. 
  5. After the shortening is melted and it's a good medium-high temperature, it's time to drop in the chicken. 
  6. IMMEDIATELY put the lid on the skillet.
  7. When the chicken is golden brown, turn it over once and cook the other side until golden brown.
  8. Remove cooked chicken and sprinkle on some salt.
  9. If you aren't immediately going to the table or have other batches to make, place the chicken in a covered Dutch oven, etc. to keep warm.

This all boils down to three easy steps:
1. Soak chicken in salted water.
2. Coat in plain flour.
3. Fry it up!!


I guess you could say there's one more step -- my favorite -- eating some juicy, crunchy, home-made fried chicken!!


Here are some other helpful hints and reminders to making great fried chicken:
  • Make sure you use a medium-high heat to cook. Too high and it will cook the chicken on the outside but not the inside.
  • Only turn the chicken over once (or twice is OK too, I have found). Turning it over and over before it really gets a chance to cook and make a crust will allow grease to seep in and you'll end up with greasy chicken.
  • Here's a fun trick to getting a golden color when using plain shortening -- add a few drops of yellow food coloring after the shortening melts to get a golden color on the crust. According to Heloise, "It's a golden yellow and looks as if it had been fried in pure butter!"
Even though this method was described by Heloise 50 years ago, it still holds true today. Good fried chicken is good fried chicken, then and now. 

Heloise said she had a group of friends come over one day who helped her try all sorts of things to come up with the best way to make fried chicken. They tried all kinds of batter recipes -- buttermilk, egg dips, etc.; used a variety of oils, grease, and shortenings; and used all types of cooking vessels -- fryers, cast iron skillets, aluminum and stainless steel pans, etc.

In the end it was the simple way that was best -- salt water soak, plain flour and frying in cast iron. Seems as if "Keep It Simple" applies even to fried chicken. :O)

Monday, February 20, 2012

Online Quilt Block Sewing Bee

I just wanted to take a minute to say how excited I am about a quilt that a fellow quilt block bee-er finished recently. Linda made a purple and pink "I Spy" quilt for her granddaughter. Isn't it lovely?!

My "Care Bear" block is second row, first block. :O)


At Linda's Chirp blog you can find a tutorial of her modified quilt-as-you-go method and more pictures of her beautiful quilt. Here's what Linda said about using this method:

The point of this technique is that with a full size backing, I could work on a section of quilting at a time without manipulating three heavy, bulky layers all the time, and there are no awkward joins that have to be covered, hand-stitched, or disguised in any way. No shoulder pain, no sewing machine getting pushed around on the table!
After reading her tutorial, it's something I definitely want to try out!!

In case you are wondering, an online quilt block bee is where sewers from all over the world come together and make blocks for each other. The bee I recently was part of is housed at Flickr. This particular group was a "mini bee" with six hive members and two months to complete the blocks. It's a fun way to discover and try new color combinations and see what other people have going on in their sewing rooms. Online bees come in all shapes and sizes -- it's all about finding one that fits your mood!!

At the beginning of the bee each person tells what particular colors or patterns they would like to have in their block. Then each sewer makes one block for each fellow hive member in the colors they requested, but uses the same pattern for each block. You mail your block to the right person and blocks come in the mail to you. Happy mail for once. :O)

I ended up making six unique blocks for my bee hive:


Here's the center of my Care Bear-themed pink and purple block for the I Spy quilt:


The goal in the end is to get enough quilt blocks from bees to make your own quilt. I love the idea of having a quilt full of blocks made just for me by fellow sewers all over the world!!

Friday, February 17, 2012

Baby Blankets 3 Ways {#3}

Here's the last of three baby blankets I made for some sweet new babies in our neighborhood!! This one is a "faux chenille" style and is so soft on the back. It even would be great in a grownup size for snuggling on the couch. :O)

To make this I used a yard of a cotton print for the blanket top, and three yards of flannel (1 yard each of three colors for variety) for the faux chenille on the bottom. You could use just one color of flannel, or three different ones to get some color variation. Either way is fine. I also used satin ribbon for the trim and two spools of thread. Yes, all that stitching takes lots of thread -- make sure you have enough so you don't run out before you're finished!!

Putting this blanket together is easy -- all you need to know how to do is make a straight stitch. But be prepared to stitch for a loooong time!! I worked on it for a half hour or so at a time so I wouldn't get tired of all the long straight lines.

The first step is to lay out your three layers of flannel, then lay your cotton fabric on top. Pin together. Now make a diagonal straight line from one corner to the opposite corner. Make sure your bobbin is full and you have lots of thread and get ready to sew!!

Stitch the layers together. Stitch on top of the diagonal line (you might want to increase your stitch length here -- it looks nicer and will make the sewing go faster). Using that line as a guide, keep stitching diagonal lines about 1/2 inch apart over the entire top. Use your presser foot as a guide -- no need to mark lines on the fabric.

Stitching on the top and bottom.

Now you are ready to cut the faux chenille. Turn the blanket over to the back (flannel facing you). Using a very good pair of fabric scissors or a chenille cutter, cut through ONLY the three layers of flannel. Be careful not to cut through the cotton or poke a hole, or you will cry and have to repair the hole.

 Flannel layers after they are cut.

Then square up the sides and bind with whatever you like and you're all done with the construction. Wash the blanket once and the cut flannel will turn into a lovely faux chenille. Every time it is washed it will get softer!!


Satin ribbon for binding with a mitered corner.


Time for a spin in the washing machine and dryer!!


Now you have a soft and textured "faux chenille"!!

This blanket has lots of texture on the top with all the close stitching, and of course on the bottom with the soft faux chenille effect. Perfect for baby to play or sleep on. You'll just want to rub your hands on it all the time; it will be hard to turn over at the baby shower!!

So pretty and soft all over. :O)

Well folks, that's all for the Baby Blankets 3 Ways series. See Blanket #1 and Blanket #2 for peeks at the other blankets I made for the sweet new additions to our neighborhood. Next up will be a baby quilt I made for my newest little nephew (yes, something for a boy!!).
Related Posts Plugin for WordPress, Blogger...